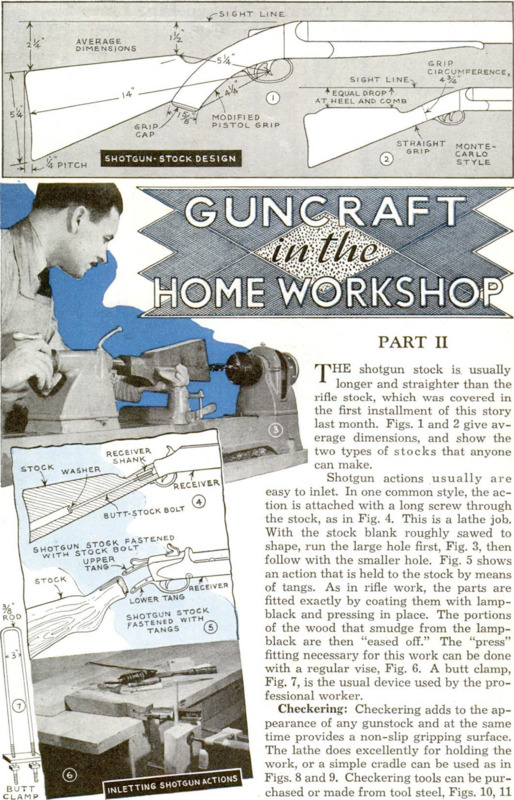
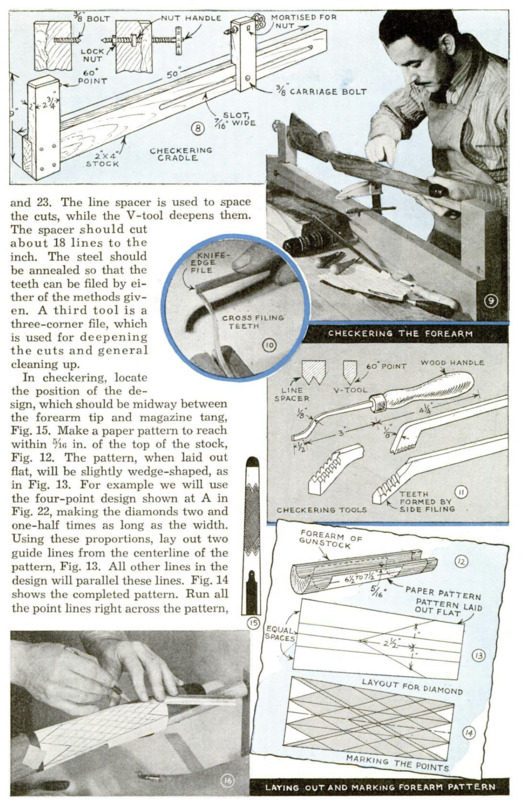
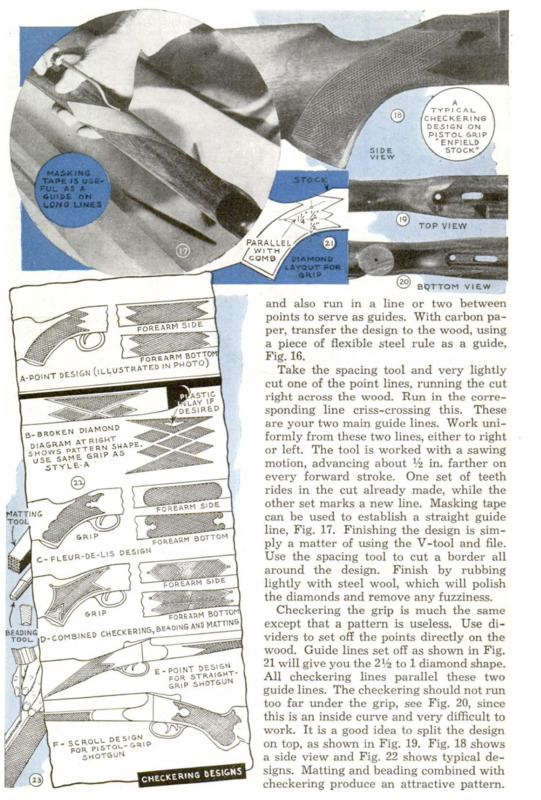
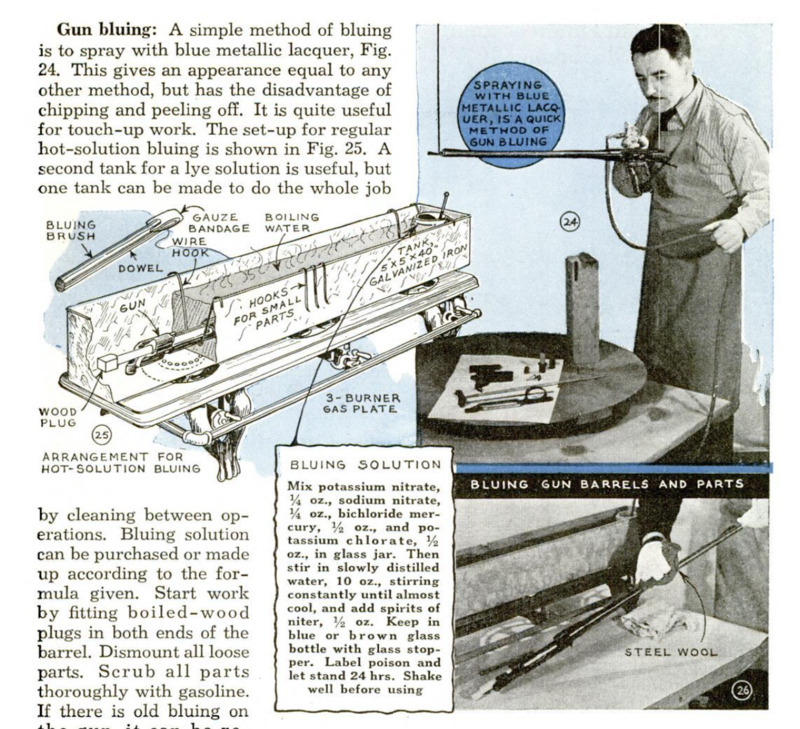
THE shotgun stock is usually Jonger and straighter than the rifle stock, which was covered in the first installment of this story last month. Figs. 1 and 2 give average dimensions, and show the two types of stocks that anyone can make. B Shotgun actions usually are easy to inlet. In one common style, the action is attached with a long screw through the stock, as in Fig. 4, This is a lathe job, With the stock blank roughly sawed to shape, run the large hole first, Fig. 3, then follow with the smaller hole. Fig. 5 shows an action that is held to the stock by means of tangs. As in rifle work, the parts are fitted exactly by coating them with lamp-black and pressing in place. The portions of the wood that smudge from the lamp-black are then “eased off.’ fitting necessary for this wo English with a regular vise, Fig. 6. Fig. 7, is the usual device used by professional worker. Checkering: Checkering: Checkering adds to the appearance of any gunstock and at the same time provides a non-slip gripping surface. The lathe does excellently for holding the work, or a simple cradle can be used as in Figs. 8 and 9. Checkering tools can be purchased or made from tool steel, Figs. 10, 11 and 23. The line spacer is used to space the cuts, while the V-tool deepens them. The spacer should cut about 18 lines to the inch. The steel should be annealed so that the teeth can be filed by either of the methods given. A third toolis a three-corner file, which is used for deepening the cuts and general cleaning up. In checkering, locate the position of the de- sign, which should be midway between the forearm tip and magazine tang, Fig. 15. Make a paper pattern to reach within 5/16 in. of the top of the stock, Fig. 12. The pattern, when laid out flat, will be slightly wedge-shaped, as in Fig. 13. For example we will use the four-point design shown at A in Fig. 22, making the diamonds two and one-half times as long as the width. Using these proportions, lay out two guide lines from the centerline of the pattern, Fig. 13. All other lines in the design will parallel these lines. Fig. 14 shows the completed pattern. Run all the point lines right across the pattern, and also run in a line or two between points to serve as guides. With carbon paper, transfer the design to the wood, using a piece of flexible steel rule as a guide, Fig. 16. Take the spacing tool and very lightly cut one of the point lines, running the cut right across the wood. Run in the corresponding line criss-crossing this. These are your two main guide lines. Work uniformly from these two lines, either to right or left. The tool is worked with a sawing motion, advancing about 1/2 in. farther on every forward stroke. One set of teeth rides in the cut already made, while the other set marks a new line. Masking tape can be used to establish a straight guide line, Fig. 17. Finishing the design is simply a matter of using the V-tool and file. Use the spacing tool to cut a border all around the design. Finish by rubbing lightly with steel wool, which will polish the diamonds and remove any fuzziness. Checkering the grip is much the same except that a pattern is useless. Use dividers to set off the points directly on the wood. Guide lines set off as shown in Fig. 21 will give you the 2% to 1 diamond shape. All checkering lines parallel these two guide lines. The checkering should not run too far under the grip, see Fig. 20, since this is an inside curve and very difficult to work. It is a good idea to split the design on top, as shown in Fig. 19, Fig. 18 shows a side view and Fig. 22 shows typical designs. Matting and beading combined with checkering produce an attractive pattern. Gun bluing: A simple method of bluing is to spray with blue metallic lacquer, Fig. 24, This gives an appearance equal to any other method, but has the disadvantage of chipping and peeling off. It is quite useful for touch-up work. The set-up for regular hot-solution bluing is shown in Fig. 25. A second tank for a lye solution is useful, but one tank can be made to do the whole job by cleaning between operations. Bluing solution can be purchased or made up according to the formula given. Start work by fitting boiled-wood plugs in both ends of the barrel. Dismount all loose parts. Scrub all parts thoroughly with gasoline. If there is old bluing on the gun, it can be removed with a 10-per-cent solution of sulphuric acid, flushing well with boiling water. Fill the tank two-thirds full of water and add a tablespoon of lye to each gallon of water. Bring to a boil. Place barrel and all parts in the tank and boil for 15 min. Flush the work with hot water and immediately after removal put it into a tank of clean, hot water. Do not touch the work with the bare hands. Wear cotton gloves or handle it by means of the wood plugs. Now for the actual bluing. Put the bluing solution, 2 oz, in a clean glass jar and suspend in one corner of the tank. Fill the tank two-thirds full of water and bring to a hard, rolling boil. When the work is heated thoroughly, apply an etching solution made by adding nitric acid, 1/2 oz., to water, 6 1/2 oz. Let stand 5 or 6 sec. and plunge back into the water. When the work is hot, remove and swab with the bluing solution. As soon as it is dry, get it back into the water. After a minute or so, remove the work and scour off the rust with fine steel wool, as shown in Fig. 26. Now, put the work back into the water and repeat the operation - heat, blue, card off the rust. Three to five applications will give a rich blue-black coating. After the final coat, swab the work with linseed oil. Wipe this off carefully as it starts to gum on the cooling metal, and then oil with any light oil. The whole operation takes about 1 1/2 hrs. Speed in application of bluing solution is essential. All other operations can be done at ordinary working speed. Note: Extreme care must be exercised in handling the etching and bluing solu-tions as they contain chemicals that are highly corrosive and poisonous. If accidentally spilled on the hands, immediately run copious amounts of water over them.
 Popular Mechanics, v. 74, n. 5, 1940

